Wednesday, 7 April 2021

Spinning a Yarn

 As a child my family always kept goats, pigs and chickens in the back garden. When I met my husband he was interested in continuing that lifestyle and we soon had a couple of rare breed pigs in our back garden. A few years later we started to keep a small flock of sheep on my parents’ newly acquired farm. We started with 6 Norfolk Horn ewes, chosen by my husband because they are a local rare breed, and 2 Gotland sheep selected by my Mum, who is a lifelong knitter and crocheter, for their excellent fleeces. As happens with these things the flock quickly expanded. We added 3 Southdowns as a subflock for our young son, who was six at the time, to begin to manage. Of course we had lambs each spring, which quickly increased the numbers. We now have a lovely mixed flock of ewes, lambs and rams. 


After 4 years of keeping the sheep and each year throwing away the fleeces because we just didn’t know what to do with them, my Mum started to look into spinning classes. My craft was always fabric based, I had recently started teaching quilting and other sewing techniques alongside my part time Primary school teaching job, so I wasn’t really interested in fibre or learning to spin. But as a good daughter willing to keep my mum company I went along to learn how to prep fibre and to use a spinning wheel. It takes a lot of concentration to learn to spin, a bit like patting your head and rubbing your tummy. You need to coordinate several never tried before skills in order to get a constant flow of yarn winding onto the bobbin. It is frustrating at first but so satisfying when it starts to come together. 

It is quite a big commitment working out whether you are going to continue a hobby that needs an expensive piece of equipment like a spinning wheel. Although wheels can be picked up quite cheaply from places like Ebay, that is not the best place to start as until you know what you are looking for you don’t know that it is in full working order. Although I enjoyed the class more than I expected I didn’t know whether a wheel is something I would continue to use.  


About a year later Mum decided she’d like to try again. This time we went on a 2 day workshop, the first day we re-learned how to spin with a wheel and the second day we really just sat and practiced. We took wool from our own sheep, drum carded it and spun ‘in the grease’, which is unwashed fibre full of lanolin (and other unmentionables!). I still vividly remember sitting there watching these creamy coloured fibres from our own Norfolk Horn sheep pulling out of my fingers and twisting themselves together to make a continuous yarn. The gentle clack of the wheel and the speeding flier became mesmerizing. I came home from that session at about three in the afternoon exhausted and slept for two hours. The concentration required for those two days was pretty intense! 


A few weeks later my Mum bit the bullet and bought us a second hand wheel from a reputable company who specialised in refurbishing spinning and weaving equipment. She let me have it first and I never looked back. Barely a day has gone by in the last 5 years when I haven't spent some time spinning. It now comes naturally and is the most relaxing way to pass some time. I have mastered creating several different types of yarn, although there is always more to learn. I have 4 spinning wheels now and absolutely love teaching others this age old super power. It has led onto an obsession with weaving, something I am very much at the beginning of even after 3 years. And of course this takes me full circle because I am now creating my own fabrics which I can sew into all manner of garments, cushions, bags and more. 


Tuesday, 9 June 2020

Making a quilt sandwich

So you have a beautiful quilt top that you have spent ages piecing and you would like to know what to do next. The good news is, this is one of the best bits of making a quilt! you take your quilt top, layer it up with wadding and a backing a suddenly it starts to feel like a gorgeously whole thing. It is now that it actually becomes a quilt.

You will need backing fabric. This can be any fabric that compliments the top. It can be plain, patterned, pieced, whatever you like. It can be any fibre, although being aware of shrinkage as an issue here, you would not want the top and backing to shrink at different rates. Pre-washing may help.
I have two favourite backings to quilts that I have made. One that was an entirely different pieced quilt of the same size. I enjoy making quilts so why not make two! The other was made from a precut charm pack. I used some of the left over charm pack to insert a row into the plain fabric backing to make it wider. In the quilt pictured here I have used a stretch plush fabric. Its a bit trickier, but makes a lovely soft back.
 You will also need wadding, sometimes called batting. There are several choices, each with their own merits. Go for a low loft wadding, this means it isn't very thick, you may think it seems too thin, but rest assured it will give your quilt a beautiful drape and it will be snuggly and warm.I would usually choose a 80/20 cotton/poly blend or 100% cotton.

Both of these need to be at least 3 inches larger than your quilt top.

To start you need a flat area to lay your quilt out and to build your quilt sandwich. I use the floor, my table is rarely big enough! Iron your backing fabric and quilt top before you start.

  • Lay your backing fabric right side down and smooth it flat. It is a good idea to secure this to the floor around the edge with masking tape to make sure it stays wrinkle free.
  • Lay you wadding over the backing fabric. I use a swimming motion with my arms over the surface to push all of the wrinkles out.
  • Lay your quilt top over this, again smoothing out all of the wrinkles by 'swimming' over the surface.                                                                                     

Your layered up quilt should look like this,
you can see the excess wadding and backing
fabric around the edge.

Curved safety pins avoid wrinkles
in the layers of the quilt
 You now need to secure these 3 layers together, there are a few choices. The easiest by far (but least environmentally friendly by far) is 505 temporary adhesive spray. This reposition-able adhesive is sprayed between the layers, simply fold back one half, spray, reposition then repeat for both halves of each layer. It is strong enough to hold the quilt sandwich together whilst you quilt. Curved safety pins are another option, but tricky if your quilt is spread out on carpet! The most traditional method is to baste or tack, using a semicircular mattress or surgeons needle to stitch through all of the layers with long stitches. Remember, you wont be able to put your hand under the quilt to guide the needle or safety pin because you will cause wrinkles.


The 'quilting' on a quilt is the act of stitching through all of the layers and it can be as simple or complicated as you'd like to be. It can be done by hand or free motion, but I am going to cover straightforward machine quilting here.
You will need a walking foot. They are a pricey piece of kit, and look a bit alarming, but they are worth the expense and are very much your friend. The action of a walking foot ensures that the layers of the quilt move through the machine at the same rate. Without it you will find the top and bottom move at different rates and you will have twists and wrinkles.


A walking foot, quilting
 guide and screwdriver


The walking foot attached to the sewing
machine.


To attach the walking foot you will need to locate the screw that holds the entire foot onto the shank, undo this screw (you may be able to see it just above the foot in the photograph) You also need to hook the arm of the foot over the screw that you use for changing the needle on the right hand side.

Before you start to stitch your quilt make sure you practise on an offcut made from the same layers as your quilt sandwich. Do this every time that you rethread your needle, change the settings or restart. it will save the heartache of trying to unpick your beautiful quilt if something is wrong,

You may see suggestions that as a beginner you should 'stitch in the ditch'. this is where the sewing line runs between the blocks along the piecing line. Although this provides a useful guide it is also a bit unforgiving of the odd wobble, any stitching out of line will show up. I prefer to 'stitch next to the ditch'. You can see that I have lined the toe of my foot up with the edge of the block so the needle will come down next to, but not in, the line of piecing.

Stitch 'next to the ditch'
roll the bulk of the quilt to
feed it through the machine
Start your quilting across the middle of the quilt and work out to the edges, this should avoid too much movement between the layers. I am quilting lines all of the way across the width of this quilt. To make life easier, roll up the bulk on the right hand side of the quilt. If possible try to support the weight of the quilt to the left on your table top, this will avoid it pulling as you sew


run the guide bar along the
previous line of stitching

You can space your stitching lines using the pattern made by the piecing of the quilt, but if that is not possible, or you would like your quilting closer together then you can use the guide that comes with your walking foot. This is a metal bar that usually clips or slides into the back of the walking foot. You can set it to to stick out from the right or left side. You may need to change sides as you quilt different lines, so measure the spacing that you choose so it can be replicated. You then run the metal bar along the previous line of stitching to ensure parallel lines. I have used this successfully to create concentric circles, so be creative.
Remember to check the reverse of the quilt regularly, if you get a wrinkle or pucker you want to sort it out as soon as possible or you may have a lot of unpicking to do. Also remember to bring your bobbin thread to the top before you start to sew or you could find an unsightly birds nest on the back.

Once you have quilted the entire surface you can admire your handy work. It is now a gorgeous, cosy, drapey whole. 

Square up the quilt, cutting away excess
wadding and backing.
The last job left for now is to tidy the edges up. For this I usually use my biggest cutting mat and rotary cutter. Your aim is to square the whole thing up and to trim the edges of the wadding and backing back to be flush with the quilt top. Depending on the size and complexity of the quilt and accuracy of your sewing,  you may prefer to trim with a pair of scissors and leave your quilt top not entirely square to avoid compromising the pattern. 

The excess has all been trimmed away and
the quilt is squared up.
Your quilt is now ready for the finishing touch, binding! 
I have recorded a video tutorial for that which is available on YouTube


I can be reached via Messenger on my Yelling Pig Facebook and Instagram accounts. I am always happy to answer questions and would love to see your quilts. 

Good luck with

Tuesday, 15 November 2016

Aga pad tutorial

Aga Pad tutorial


I have been making heatproof pads as covers for the lids of Agas, Rayburns and Everhots for a few months now, and am finding it difficult to keep up with demand. Many people seem to be finding that there is not much commercially available and the fabric choice is limited. Perhaps some of you would like to whip up your own to match your kitchen or cooker? You can make them up in any size to use as a heatproof pot holder, place mat or whatever, They are so useful!

You will need 4 layers; cotton terry towelling,
                                      cotton batting or wadding, 
                                      heatproof layer (Insulbrite)
                                      decorative cotton top layer. I use a cotton curtain or upholstery weight fabric.


These need to be cut to size, circles of  38cm are about right.  They then need to be attached together. I use 505 temporary adhesive to keep the layers together and then stitch the layers together on the machine. It doesn't matter which way around you layer the Insulbrite and wadding. You can stitch any pattern that suits the fabric, I like concentric circles on an Aga pad, which I mark out with a Frixion pen, these marks can be erased with the heat of an iron after they have been sewn. A walking foot is very useful here, but it can be done with an ordinary foot, just take care the layers don't slip.

To neaten the edges you will need to bind them. You will need bias binding, which will stretch around the curve. It is best to buy the widest one you can, because that makes it easier to enclose the edges. 

To bind, open out the tape and lay one edge against the edge of the top of the pad. fold over a couple of centimetres of the binding at the start to neaten the edge when you have finished.

You will need to stitch in the crease line closest to the edge of the pad.

.
Once you have stitched all of the way around the binding on the top side you will need to tidy up the layers by cutting away any excess. You then need to turn over and secure the binding on the back. (At this point you can add a strap to hook around the handle to keep the pad in place when you lift the lid. See below  for this optional extra.)


 Turn the pad over and wrap the binding around to the towelling side of the pad.


I use the stitch that puts my needle to the left,
closest to the edge of the binding 


When you get back to the beginning, your pad is finished.
It can be pressed if necessary. It can be washed at 40 degrees, which may cause it to shrink a bit giving it a lovely wrinkly look. In my experience it tends to grow again as it sits on the lid.


Optional extra; hanging loop (I am using photos from another set of pads here, which is why the loop is in the fabric from the pad itself)

This can be made with a left over piece of binding, but it will be sturdier if made with an offcut of your top fabric. 
  • cut a piece roughly 20x10cm
  • fold in half longways, right sides together
  • stitch along the top and down the length with approx 1cm seam allowance
  • clip the top corner
  • use a chopstick or similar to push the loop through so right sides are outside. Push out the corner
  • press flat
  • attach velcro; hooks to closed end and loops about 6cm up from open end.


  • find the centre of the towelling side of the pad
  • pin the loop into the binding at the centre before stitching the towelling side.
  • stitch the loop into the binding as you sew around the pad. (I reverse the stitching once I have gone over the loop, so I have stitched forward and back and forward to secure it)
  • once the binding is finished lift the needle and stitch forward and back and forward over the loop at the outside edge of the pad for extra security.


If you use this tutorial I would love to see what you make and would be interested to hear how you got on. I'm always happy to answer questions. Good luck.
I hope to see you on Facebook or Instagram. 'Yelling Pig' 🐷


Monday, 9 May 2016

Rayburn/Everhot lid cover, all purpose heatproof pad tutorial


I have been making heatproof pads as covers for the lids of Agas, Rayburns and Everhots for a few months now, and am finding it difficult to keep up with demand. Many people seem to be finding that there is not much commercially available and the fabric choice is limited. Perhaps some of you would like to whip up your own to match your kitchen or cooker? You can make them up in any size to use as a heatproof pot holder, place mat or whatever, They are so useful!

You will need 4 layers; cotton terry towelling,
                                      cotton batting or wadding, 
                                      heatproof layer (Insulbrite)
                                      decorative cotton top layer. I use a cotton curtain or upholstery weight fabric.


These need to be cut to size and then attached together. I use 505 temporary adhesive to keep the layers together and then stitch the layers together on the machine. You can stitch any pattern that suits the fabric, or just opt for straight lines. A walking foot is very useful here, but it can be done with an ordinary foot, just take care the layers don't slip. 

Now the layers are securely together you can trim carefully to make sure the pad is exactly the right size, the layers are together and the corners are square.
To neaten the edges you will need to bind them. You can make your own binding (it doesn't need to be bias binding, it can be cut from the straight grain of the fabric) or you can buy bias binding for ease, which is what I tend to do. You will need to buy the widest one you can. 

To bind, open out the tape and lay one edge against the edge of the top of the pad. fold over a couple of centimetres of the binding at the start to neaten the edge when you have finished.

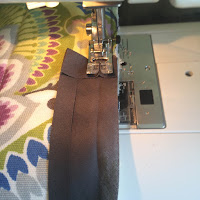
You will need to stitch in the crease line closest to the edge of the pad.

If you would like beautifully mitred corners follow these steps; 
Stitch almost to the corner, then fold the binding as shown
Fold the binding back on itself at a right angle 

Lift the foot and begin stitching from the top of the next side.


When you have finished adding the binding it will fold back like this.

Once you have stitched all of the way around the binding on the top side, you need to turn over and secure the binding on the back. (At this point you can add a strap to hook around the handle to keep the pad in place when you lift the lid. See below  for this optional extra.)


 Turn the pad over and wrap the binding around to the towelling side of the pad.


I use the stitch that puts my needle to the left,
closest to the edge of the binding 


 When you get to the corner, lay the binding straight ahead of the needle and then fold the next side back to create a mitred corner as pictured. Swivel at the corner with the needle in the fabric.


When you get back to the beginning, your pad is finished.
It can be pressed if necessary. It can be washed at 40 degrees, which may cause it to shrink a bit giving it a lovely wrinkly look. In my experience it tends to grow again as it sits on the lid.

Optional extra; hanging loop

This can be made with a left over piece of binding, but it will be sturdier if made with an offcut of your top fabric. 
  • cut a piece roughly 20x10cm
  • fold in half longways, right sides together
  • stitch along the top and down the length with approx 1cm seam allowance
  • clip the top corner
  • use a chopstick or similar to push the loop through so right sides are outside. Push out the corner
  • press flat
  • attach velcro; hooks to closed end and loops about 6cm up from open end.
  • find the centre of the towelling side of the pad
  • pin the loop into the binding at the centre before stitching the towelling side.
  • stitch the loop into the binding as you sew around the pad. (I reverse the stitching once I have gone over the loop, so I have stitched forward and back and forward to secure it)
  • once the binding is finished lift the needle and stitch forward and back and forward over the loop at the outside edge of the pad for extra security.
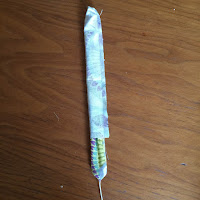
Here I have stitched a piece of string into the
 loop to help with turning


If you use this tutorial I would love to see what you make and would be interested to hear how you got on. I'm always happy to answer questions. Good luck.
I hope to see you on Facebook or Instagram.